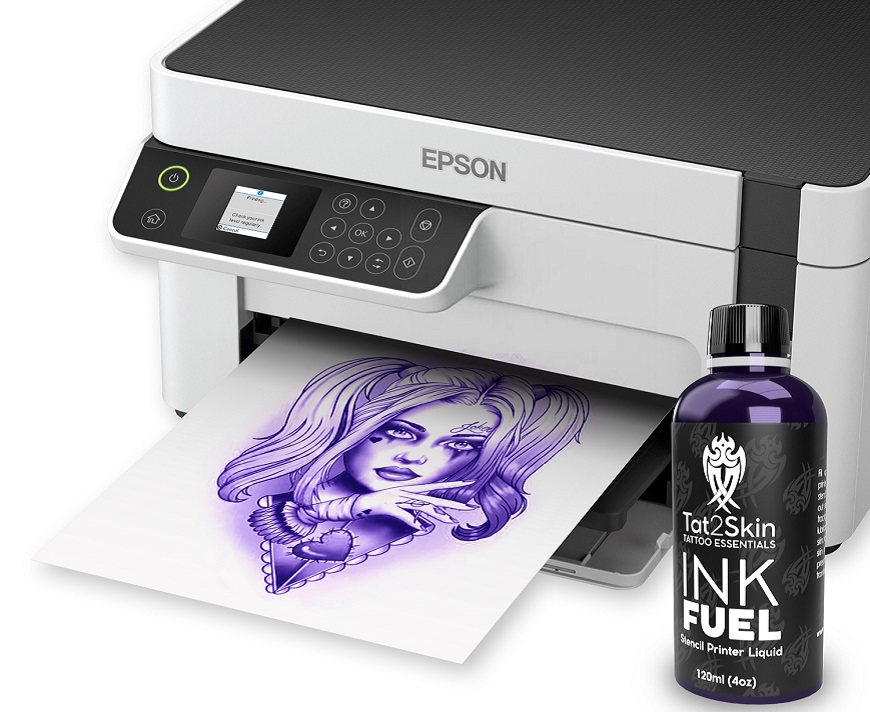
Making your own tattoo stencil at home can be an easy, cost effective way to create the body art of your dreams! By utilizing an inkjet or laser printer, you can get a great quality stencil that lasts for years. If you’re more of a traditionalist and want a more rugged look, you can also try using a dot matrix printer. How to make a tattoo stencil with a regular printer.
For those looking for even more precise stencils, then a laser printer is the right choice. No matter what method or materials you choose, creating your own tattoo stencil will ensure that your tattoo looks perfect before ink ever touches skin. So with the right know-how and simple materials which you likely already own, why not give it a shot?
How To Make A Tattoo Stencil:
Materials You’ll Require:
1) Transfer or wax paper
If you’re looking to give your tattoo that professional edge, consider investing in transfer paper specifically designed for use as stencils. It’s an affordable way to take the quality of your art up a notch – and it can be found at most craft stores!

2) An ink pen with a fine, pointed tip
For the tattoo enthusiast looking to up their game, transfer paper specifically designed for use as stencils is a great way to add a professional edge. Not only is it affordable, but you can also find this product at most craft stores – take your artistry to the next level!
Using a marker to create designs on fabric seems like an easy solution but it can lead to lingering marks that won’t come out with a simple water wash. Avoid this mess and opt for pencil instead – your future self will thank you when application time comes!
3) Masking tape
Need something to stick to your skin? Try painter’s tape or scotch! They won’t leave any residue behind when you remove them.
When it comes to getting a tattoo, make sure you don’t pick something too bold – less is more! For extra convenience and cost-efficiency, try using an existing stencil from your last design.
4) Razor for shaving
Instead of wasting time and energy de-bursing your transfer paper, utilize a razor blade for the utmost precision in trimming off any excess. Be aware that great care is needed when handling this sharp utensil to avoid accidental injuries!
5) Container of water
To ensure a flawless finished product, keep some water nearby during the stenciling process – it’ll help prevent any smudging or other mess-ups!
6) Antibacterial soap
To stay safe and healthy, it’s wise to take extra precaution if you have any open wounds or skin that could easily become infected. Taking the necessary steps now can help prevent further issues down the road!

7) Stencil lotion or glycerin-based stick deodorant
To keep the design looking perfect, it’s essential to use a stencil that won’t smudge or become distorted during application. That way your work will stay crisp and pristine from start to finish!
If you’re looking for a tattoo, remember that many shops carry anodyne ointment as a go-to aftercare product. But don’t worry if it’s not available – petroleum jelly is just as effective!
8) Tattoo ink of your choice (optional)
In order to ensure a smooth, flawless tattoo design on your skin, having extra black pigment available is essential. It will allow you to fill any gaps between lines in the design and make it look perfect!
Steps to Make a DIY Tattoo Stencil:
1) Sketch and practice your design
Unleash your creativity and get sketching! If you already have a design, put pencil to paper for the next step; if not, start exploring all of the possibilities with freehand drawings on plain paper. Don’t be afraid to experiment until you’ve created something that’s truly satisfying.

Give your creation definition and clarity by sketching bold outlines, which will be visible even when transferring or tracing with wax paper.
2) Trace onto transfer or wax paper
Ready to bring your vision to life? The next step is tracing! Place the transfer paper over a design you like and delicately trace it with an ink pen. Soon, your intricate artwork will be ready for its debut on whatever surface of choice!
For smooth and precise tracing, affix the design sheet and transfer paper to a flat work surface with some masking tape. This will ensure your masterpiece won’t be ruined by any slips of the hand!
In order to ensure our transfer paper remains unscathed, it’s critical that we use premium quality masking tape.
After painstakingly tracing out your intricate design, it’s time to gently peel off the masking tape with confidence. Trust that you won’t have any misprints or upside-down surprises – this masterpiece of yours will be placed on display – either directly onto yourself or a lucky customer!

Tracing a picture can be made much easier with the right equipment, such as drafting tables or desk lightboxes. If you don’t want to spend extra money on special items, why not use what’s already around? Natural sunlight filtering through your window glass makes it easy to trace designs during the day – all you need is some design paper and transfer sheet lining those windows!
Rather than tracing the design by hand, opt for an overhead projector or slide projector to project it directly onto your canvas – skip transfer paper as this step is not required.
Create beautiful body art with ease! With the use of advanced machines, you can now avoid time-consuming transfers and directly print your design onto wax paper or transfer paper. Make sure all lines are completely filled in with black ink before applying to skin – it’s that easy!
Utilizing a projector for design transfers can be an efficient way to create artwork in less time, no mess included. This ensures that all parts of your image are untouched and you don’t have to worry about accidental smudging or imperfections!
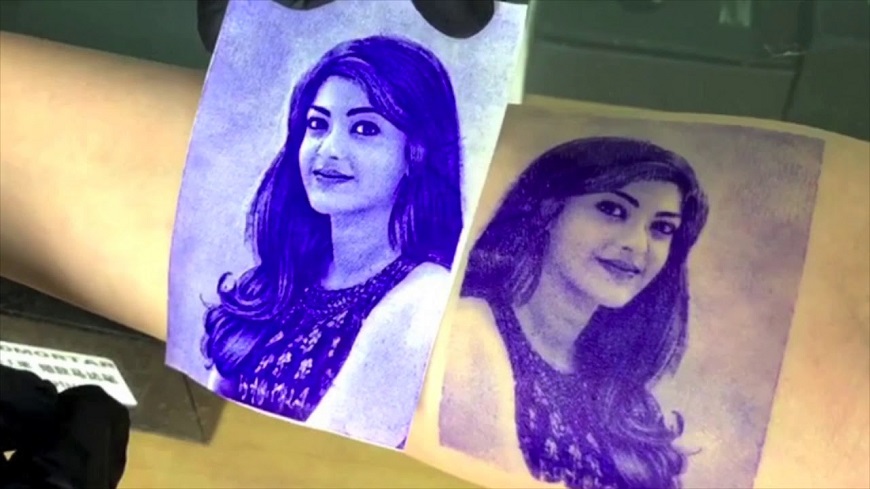
3) Transfer design to skin
Ready to make your mark? You’ve taken the necessary steps, and now it’s time to get inked! Before putting that impressive design on your skin, however, this important area must be properly prepared. Keeping it clean is essential for not only achieving accuracy but also ensuring safety during the process. Be bold—let’s do this thing!

To get started, it’s important to give the area a precise and smooth shave with a razor. After that, use antibacterial soap along with lukewarm water for cleansing before making stencil prints – this will create an optimal surface and prevent bacteria buildup in the future!
After you’ve prepped your skin, pat the area dry and apply stencil ink. This helps ensure a flawless tracing that will stay put!
Becoming a tattoo removalist requires more than just finding the right ink! To apply it correctly, make sure that the liquid side of your stencil is facing your canvas. Then carefully pat each area until every part has been successfully transferred to their new home – onto skin.
Tap lightly over the stencil to ensure crisp, clean ink lines – avoiding any rubbing motion that could blur them. For best results allow it 2-3 minutes before peeling away for an expert finish.
Once the timer runs out, delicately peel away the stencil paper to reveal a blank canvas ready for inking. A professional tattoo artist can then turn your vision into reality using their expert technique and top-of-the-line equipment.
Don’t let your hard work go to waste–follow the transfer paper instructions carefully and use light pressure when tracing over lines. This will guarantee a beautiful, crisp design with no smudging!
How do you transfer ink from paper to skin?
After soaking a tissue paper in ink, press it onto your moist skin and hold for several seconds. Then witness the mesmerizing effect as an intricate design is transferred from the paper to you!
How do you make homemade stencils?
With a few simple steps, you can bring your designs to life with a stencil! Start by sketching out the design onto tracing paper or parchment. Trace the parts you wish to keep on another sheet of paper before delicately cutting them away and taking one step closer towards unique artwork.
To ensure that each detail of your masterpiece is captured, an X-acto knife can expertly help you make those precise cuts. But don’t forget – safety comes first!
Can you use normal paper for a tattoo stencil?
Ready for a unique ink job? With the right materials and your trusty printer, you can create custom tattoo stencils. All that’s needed is either thermal paper, carbon transfer paper or temporary tattoo paper – no matter if it’s an Inkjet or Laser one! Get creative and show off some serious artistry with this DIY method.
Can you use a Sharpie for tattoo stencil?
For a truly precise design, use only the finest pen or marker when stenciling – too thick of lines can make it hard to see through for transferring onto skin. If you must opt for Sharpies, double check that their tips are thin and won’t cause any smudging leaks!
What can I use instead of tattoo transfer paper?
Tattoo art has a long, storied history and an important part of it is the use of hectograph transfer paper. This classic method involves hand-drawing or dot matrix printing intricate patterns onto specially designed paper which can then be transferred to skin for permanent body modification. Despite its age, this innovative technique still remains a favorite among experienced tattoo artists today!
Despite being a more affordable route, freehand tattooing can quickly become overwhelming and costly if you’re not an experienced artist. The key is to know the fine line between skillful artistry and potential disaster!
Thermal paper has taken the tattoo world by storm – its heat-activated design technology is perfect for creating unique, clean stencils that can be seen on any kind of skin. Its versatility and precision have made it a go-to choice for professional artists, providing their clients with pristine tattoos every time!
Thermal paper is no ordinary stationery – with four distinct layers, it can preserve intricate designs and more detailed information. Every aspiring tattooist should take note of this special paper – an essential tool in the industry!
What can I use to stick a tattoo stencil on?
Transfer paper is the go-to method for transferring intricate tattoo designs from place to place. While it may only last until fading begins, this medium can help make permanent marks that will delight and inspire onlookers for a lifetime!
How do you make a stencil without a machine?
If you want to express yourself through art but don’t have a tattoo machine, creating a stencil is the perfect way! Just grab some carbon paper and an X-acto knife for your crafty endeavor. Trace out your design onto the carbon copy with a pencil then carefully cut it out using the X-acto blade – et voila: You’ll have created an image that’s ready to be transferred onto skin!
Create unique, personalized tattoo designs with all the tools you already have in your home! Experiment and explore different transfer papers and methods to find what suits you best – there’s no single answer when it comes crafting beautiful body art.
You may also be interested: Can you use sublimation ink for regular printing?
What can I use for a stick and poke stencil?
Stick and poke tattoos may at first seem like a quick and easy solution to permanent body art, however they often fade over time due to the varied skill levels of each artist. Each line must be meticulously re-drawn several times before ink will stay in place on the skin, which can make all the difference between vibrant colours that last through time or fading hues with weakened lines – just one more proof that great artwork takes patience!
It’s time to take action! You’ve got the task at hand, so put your plans into motion and see where it takes you. There are sure to be rewards along the way – don’t miss out on them by waiting any longer!
- For the perfect reproduction of your design, use a sheet of velvety brown paper. Trace your artwork onto this semi-transparent surface to ensure that all intricate details will be captured!
- Using their intricate design, draw on the white paper to bring it to life with a unique brown overlay. Together they create an exquisite and vibrant pattern!
How do you make tattoo stencils with baking paper?
Create unique patterns for your stencil using baking paper! Print out beautiful designs with carbon transfer sheets, just like printing on thermal paper. Keep it smudge-free to ensure a perfect end result!
Give your designs the ultimate finish by transferring them onto baking paper! When ready, firmly go over it with a pen or pencil and watch as your image starts to appear. After cutting around the edges you’re all set – making art from something that was once just an idea!
No need to skimp on the supplies for your stick and poke tattoos! Most supermarkets and craft stores are stocked with inexpensive baking papers – so get ’em while they’re hot.
What can I use to draw on skin before a tattoo?
Tattoo artists often employ the use of Sharpie markers to bring art alive by etching intricate designs on skin and creating captivating, beautiful works.
Can you use a pen for a tattoo?
For those wanting to tatoo themselves or loved ones, forget using a traditional pen! Tattoo artists recommend Sharpie markers for their clarity and boldness when creating intricate designs on the skin. With its thicker ink, you can be sure that your tattoo will stay put without running off!
How to make a tattoo stencil out of tracing paper?
Get ready to make your very own personalized tattoo stencil from the comfort of home! All you have to do is print out an awesome design on carbon transfer paper – it’s just like printing onto thermal paper, minus any fear of smudging. So go ahead and create a masterpiece that’ll last for years!
Get ready to make your own masterpiece! After you’ve printed out the design of your choice, grab a sheet of tracing paper and press it onto the image. Trace around all sides with a pen or pencil for an inner-artist’s version of stenciling – just be sure not to miss any details as you cut along its edges afterwards. And voilà: one personal artwork created from scratch!
No need to break the bank – tracing papers are an affordable and accessible way to get beautiful stick and poke tattoos without sacrificing quality.
How do I transfer pictures to edible sugar paper?
Bring an old printer back to life! Perfect for adding a personal touch, create edible pictures with any inkjet. Just clean it up and get ready to make cakes come alive—just don’t try using your current printer since sugar picture transfers won’t work here.
To ensure the best possible results for your projects, it is highly recommended to invest in a dedicated inkjet printer that will be solely devoted to bringing out the exceptional potential of your prints.
Step into the future with desktop combination printers that allow you to create edible images without ever needing a computer!
Read more: Tiny office printer crossword

Hi, I’m artist and sublimation printing expert. Born and raised in Anchorage, Alaska, I had passion for photography and painting from my childhood. I started my career as a sublimation print operator for a local printing company in 2012. The role exposed gave me lots of practical knowledge about printing process, from managing color profiles to ensuring print quality on various materials.
Leave a Reply to Hi Hairstyles Cancel reply